GitFlow Strategy
Gitflow is a branching model for Git, created by Vincent Driessen, that provides a robust framework for managing larger projects with multiple developers. It defines a strict branching model designed around the project release
This strategy includes main, develop, feature, release, and hotfix branches, with CI/CD integration and the use of Fork for collaboration.
How it works

Develop and main branches
Instead of a single main branch, this workflow uses two branches to
record the history of the project. The main branch stores the official
release history, and the develop branch serves as an integration branch
for features. It's also convenient to tag all commits in the main branch
with a version number.
The first step is to complement the default main with a develop branch.
A simple way to do this is for one developer to create an empty develop
branch locally and push it to the server:
git branch develop
git push -u origin develop
This branch will contain the complete history of the project, whereas main
will contain an abridged version.
Branching Model
- Main: Production-ready code.
- Develop: Integrating features before production. Its created from
main - Feature: New features or bug fixes. Its created from
develop. When a feature is complete it is merged into thedevelopbranch - Release: Preparing new releases. Its created from
develop. When the release branch is done it is merged intodevelopandmain - Hotfix: Urgent fixes in production. Branch created from
main. Once thehotfixis complete it is merged to bothdevelopandmain
Workflow Steps
Fork the Repository: Each developer forks the main repository to their own GitHub account.
git clone https://git.cglcloud.com/your-org/your-repo.git
cd your-repo
git remote add upstream https://git.cglcloud.com/your-org/your-repo.git
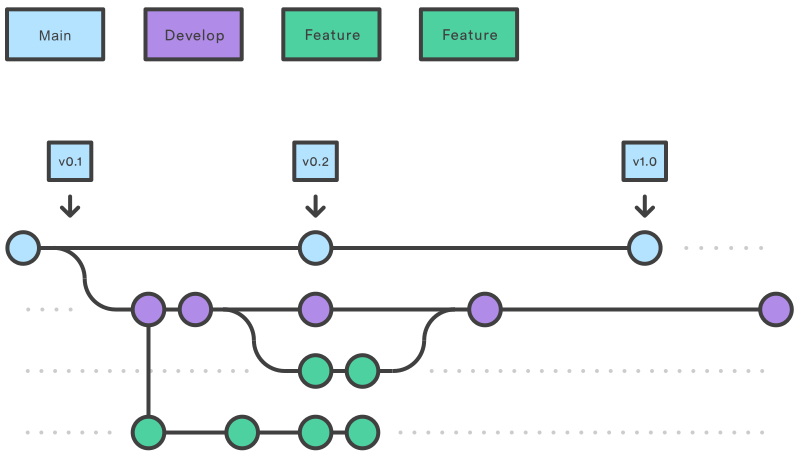
Feature branches
Each new feature should reside in its own branch, which can be pushed to the
central repository for backup/collaboration. But, instead of branching off
of main, feature branches use develop as their parent branch. When a
feature is complete, it gets merged back into develop. Features should
never interact directly with main.
git checkout -b feature/awesome-feature develop
Develop and Commit: Develop your feature or fix in the feature branch. Commit changes frequently with descriptive messages.
git add .
git commit -m "Add new feature"
Push to Fork: Push your feature branch to your forked repository.
git push origin feature/awesome-feature
Open a Pull Request: Open a pull request from your forked repository to
the develop branch of the main repository. Ensure code review and automated
tests are completed before merging.
Merge and Delete (Optional): Once approved, merge the pull request into
develop. Delete the feature branch to keep the repository clean.
git branch -d feature/awesome-feature
git push origin --delete feature/awesome-feature
Release branches
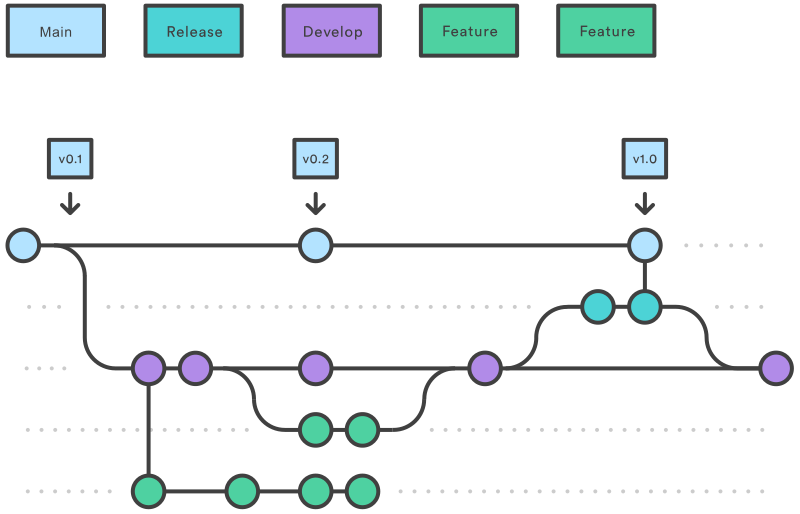
Once develop has acquired enough features for a release (or a predetermined
release date is approaching), you create a release branch off of develop.
Creating this branch starts the next release cycle, so no new features can be
added after this point—only bug fixes, documentation generation, and other
release-oriented tasks should go in this branch. Once it's ready to ship,
the release branch gets merged into main and tagged with a version
number. In addition, it should be merged back into develop, which may
have progressed since the release was initiated.
Using a dedicated branch to prepare releases makes it possible for one team to polish the current release while another team continues working on features for the next release. It also creates well-defined phases of development (e.g., it's easy to say, “This week we're preparing for version 4.0,” and to actually see it in the structure of the repository).
Making release branches is another straightforward branching operation.
Like feature branches, release branches are based on the develop branch
Create a Release Branch: When ready for a new release, create a release
branch from develop.
git checkout -b release/1.0.0 develop
Once the release is ready to ship, it will get merged it into main
and develop, then the release branch could be deleted. It’s important to
merge back into develop because critical updates may have been added to the
release branch and they need to be accessible to new features.
Perform final testing and minor bug fixes on the release branch. Merge the
release branch into both main and develop, and create a tag.
git checkout main
git merge release/1.0.0
git tag -a 1.0.0 -m "Release 1.0.0"
git checkout develop
git merge release/1.0.0
Hotfix Branches
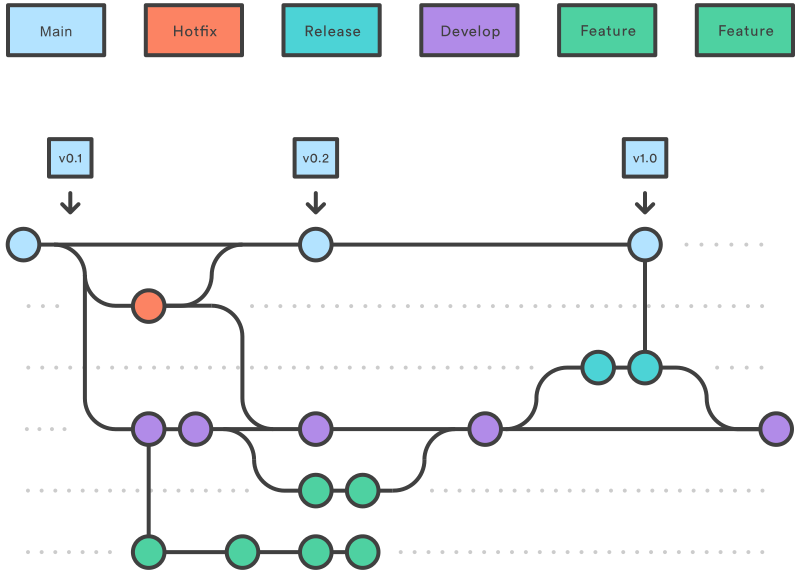
Maintenance or “hotfix” branches are used to quickly patch production
releases. Hotfix branches are a lot like release branches and feature
branches except they're based on main instead of develop. This is the only
branch that should create directly off of main. As soon as the fix is
complete, it should be merged into both main and develop (or the current
release branch), and main should be tagged with an updated version number.
Having a dedicated line of development for bug fixes lets your team address issues without interrupting the rest of the workflow or waiting for the next release cycle
git checkout -b hotfix/1.0.1 main
git add .
git commit -m "Fix critical bug"
git checkout main
git merge hotfix/1.0.1
git tag -a 1.0.1 -m "Hotfix 1.0.1"
git checkout develop
git merge hotfix/1.0.1
Deployment Process
-
Deploy to the Dev Environment: When a PR against
developis merged, the resulting branch will be automatically deployed to the development environment. -
Deploy to Stage: Ensure the currently deployed dev environment passes QA checks. Create a new release branch following the format "release/*". The resulting branch will be automatically deployed to the stage environment.
-
Deploy to Prod: Open a pull request from
release/*branch to themain. To trigger the production deployment create a tag in themainbranch. Some good tag names might bev1.0.0orv2.3.4.
Rollback Process
-
Identify the tag or commit: Determine the specific tag or commit you want to roll back to. Tags are often used for this purpose because they mark specific releases. Example: If you want to roll back to version
v1.0.0, you would use the tagv1.0.0. -
Check out the tag or commit: Use the
git checkoutcommand to switch to the desired tag or commit.git checkout v1.0.0 -
Deploy the rolled-back version: Deploy the code from the checked-out tag or commit to your production environment. This ensures that the previous stable version is now running in production.
# Deploy the code to production -
Create a new branch (Optional): If you need to make further changes or fixes based on the rolled-back version, create a new branch from the tag or commit.
git checkout -b rollback-fix v1.0.0 -
Merge fixes back to main branch: After making necessary fixes, merge the changes back into the
mainbranch and create a new release.git checkout maingit merge rollback-fixgit tag -a v1.0.1 -m "Hotfix after rollback"git push origin main --tags
For more info please refer to the following documentation Atlassian Gitflow Workflow.